Hiking Hoverla, The Tallest Mountain In The Ukrainian Carpathians
Hoverla mountain is the tallest mountain in Ukraine and the pride of its people. The height of Hoverla is 2061 meters (6614 feet) and it is located in the Zakarpattia region (Western Ukraine). Hiking Hoverla is a popular activity for Ukrainians as well as tourists to the country. If you are an avid hiker then this mountain will be a breeze. If you are not an avid hiker, well, it isn’t that difficult anyway.

Last weekend I finally took my partner Cody to the top of the mountain and while I have done this before, my last summit was more than 10 years ago. This time I arranged a weekend trip from Lviv (click here to check the list of the top things to do in Lviv ) where I live. So, here are all my tips on how to get to Hoverla and how to climb it.

We started our day (at 7:30 am) from the village Verkhovyna which is located in Ivano-Frankivsk region. The drive from our lodge to the check point (KPP v Karpatskiy prirodnyy zapovednik) took us 40 minutes. At the check point you will be asked to show your documents (so don’t forget to bring your ID) and buy a ticket which is 30 UAH per person ($1.2). They do not take card so you will need to pay with cash.

After passing the check-in point you will see a forest road. You can leave your car at the check point and walk all the way to the bottom of Hoverla or you can drive, but be aware that the road is full of rocks and deep muddy puddles. The walk and the drive will take around the same time, due to the difficult road but most people drive anyway (including us). The forest road from the check point to the base of the mountain is 8 km (26247 foot).
At the base of Hoverla there is paid parking which costs 20 UAH ($0,8) per 6 hours. There is also a small market street. By the way, if you don’t want to pay for a parking spot or there are no free spots, just go back 200 – 300 meters and you can leave your car along the side of the road for free.

The market contains a few wooden stalls with many useful things, souvenirs, and some snacks. What useful things you might ask me? Well, here you can rent trekking sticks (30 – 50 UAH for a pair), buy a plastic raincoat, and hats and gloves if needed. At the market you can even rent waterproof shoes, although they are made of rubber and not very comfortable. And of course, water and some food for the long walk up will always be useful.

Hiking Hoverla

Hoverla mountain has two roads for climbing up: green and blue. What is the difference between them? The green road is a little bit longer and has less of an incline, whereas the blue road is rockier, steeper, and therefore quite a bit shorter. There are a few recommendations for which one to choose:
Blue Road: Better for fit people or those who want to work more. Also the blue road is better on rainy days as the Green Road tends to get quite muddy.
Green Road: The Green Road is better if you are climbing with kids or animals (people do climb with dogs); if not raining the ground is dry and not slippery.

Forest Area
Both roads go through four different areas. The first one is the Forest Area. You will go up through a quite thick forest with many roots sticking out of the ground. This part of the road is not that difficult, except that tree roots can be extremely slippery, so please watch your step!
Hiking the Forest Area of Hoverla: 30 minutes

Brush Area
The second part goes through the Brush Area. And although you will not climb through the roots anymore, you still need to watch your step because this is where pebbles and rocks start to appear. The whole walk through this area is less steep than through the forest and very pretty.

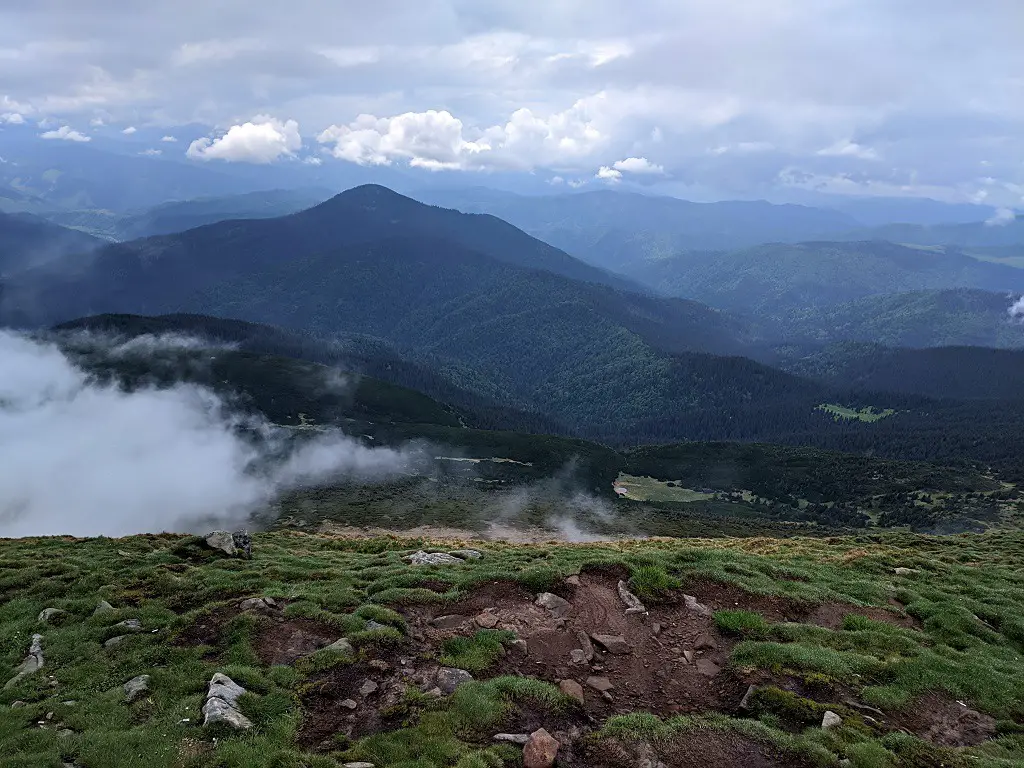
This is the part where you can get very beautiful photos of the mountain view (if there is no fog).

Hiking the Brush Area of Hoverla: 1 hour
Rocky Area
The third part is the most dangerous – the Rocky Area. This part of the climb will affect your knees since you’ll need to do wide steps up. Why is this part the most dangerous? Simply put, it is quite steep, and the rocks can be wet, therefore slippery. Some of them are even unstable, so please, please, please Watch Your Step! This area will lead you all the way to the top of Small Hoverla.

Small Hoverla is a flat landing before you make the final ascent to the peak of Hoverla. This is the place that usually deceives every hiker and makes them hope that this is the end. Well, nature has some cruel jokes as well.

Hiking the Rocky Area of Hoverla: 1 hour
Peak of Hoverla
And the last part is the Peak of Hoverla. I actually found this section not that hard and quite pleasant, although because this is the final section you are quite tired by this point. This part is actually the most difficult if you go in the middle of winter because there can be quite a bit of snow, however we climbed in the middle of June this year and it was still snowy in some parts.

This is also the place where you can see wild purple crocus flowers. Be aware that crocus flowers are endangered in Ukraine and it is forbidden to collect them.

Hiking to the Peak of Hoverla: 30 – 40 minutes
At The Peak Of Hoverla

Once you are on the top of Hoverla, you will see a small landing with a stone monument, a cross, and a black board that contains the soil from all parts of Ukraine.

The top of Hoverla is the place where everyone usually has lunch (whatever food you brought with you) and have a bottle of champagne (which has become a tradition between Ukrainians).

It is not safe to drink at the top of Hoverla mountain, so don’t drink more than a small glass of champagne. Or don’t drink at all if you can’t handle alcohol!

At the very top you also will find the famous Tea – Guy. This is the person who sells hot tea and coffee at the top of Hoverla so you can have something hot. By the way, on the peak of the mountain it can be extremely cold and windy and hot tea is what you want most. Prices are unbelievably low for such services. The Tea guy charges just 20 UAH ($0,8) for a cup of tea and 25 UAH ($1) for a cup of coffee.

The approximate time that people spend at the top is between 15 and 30 minutes depending on how cold and windy it is. We on the other hand got very lucky that the wind was minimal, and the temperature was comfortable, so we spent an hour just relaxing, flying our drone, and enjoying lunch.

Going Back
The climb down for almost everyone is way easier. But do not be relaxed as it is also way more dangerous. This is the time to make full use your trekking sticks.
First, every time you are going to make a step down, stick your trekking stick in front of you, so if you will start sliding down the sticks will hold you.
Second, do not put your foot straight, tilt it! That will prevent you from sliding on the mud.
And third, do not use your phone while walking down the mountain. Always and I mean it, always watch your step, especially at the rocky area!!!

The walk back takes between 2 and 2,5 hours. Do not forget to do a few stops to take a short rest. This is important on the way back as well. Why? Because on the way back from the mountain you use muscles that you do not usually use, so after a while your legs can start shaking which can lead to a fall.

On the way back we found a place with a bit of snow and managed to slide down on our foamy sitting pads. And you know what guys? That was so much fun, totally worth it to get a bit wet from the snow!
Gear You Need For Hiking Hoverla
Backpack: To climb to Hoverla you need to prepare a normal size backpack, better if the straps are thick so you do not hurt your shoulders while you are climbing.
Shoes: The best shoes are the proper trekking boots; They will protect you from sliding, mud, and water. If you do not have boots then wear sneakers with rubber lug soles. These shoes will be good enough, although it is possible to get wet sometimes. And the worst will be just running sneakers simply because you will have higher chances to fall, especially on the way back.
If you are not sure in your shoes and think that it is possible to break them or get too wet for your comfort, bring a backup pair of light sneakers and backup socks with you.
Do not wear heels, sandals, flip-flops or any other shoes with flat bottoms!
Clothes: To hike the mountain it is better to wear thin comfortable pants, high socks, and a long sleeve thin shirt. This is the set of clothes that you will wear at first, but do not forget that it can be very cold at the top of the mountain. Therefore, pack your backpack with a hoody or sweater, a thin windbreaker, a thin hat, and you can bring even gloves (it will not hurt you, believe me).
Ones of the must bring things to Hoverla is raincoat and trekking sticks. You can bring yours or buy (rent) both of those of those things at the bottom of Hoverla for a cheap price.
Sunscreen and lip balm: put the sunscreen on at home on your open body parts, so you won’t burn your skin. Even if the weather is not sunny! Lip balm can be brought with you of course.
Sunglasses
Medicine: plaster (for possible blisters), painkillers for headache, bandages, and other things you think you may need
Food and Water: chocolate bars (fast energy), nuts, dry fruits, sandwiches for the peak (at the peak everyone is always very hungry). 1,5 liter of water per person
Plastic bags: you will need them for garbage or to protect your electronics during hard rain.
Cash: to pay for the entrance ticket 30 UAH ($1,2), possibly buy raincoat or rent trekking sticks 30 – 50 UAH ($1,2 – $2), buy any other snacks or souvenirs at the bottom of the mountain, and to pay for hot tea or coffee at the peak (if you want of course).
ID: bring your passport, ID card, or a driving licence. At the check point they will check your ID and register you in case you get lost and do not make back, although it is very hard to get lost there.
Foam Pad: for sitting during breaks, and sledding if you see snow and want some fun.
Hiking Hoverla, The Tallest Mountain In Ukraine

Related Posts

Restaurant Review: Kim Kimchi Korean BBQ in Lviv, Ukraine
Lviv is famous for its culinary scene. Many famous Ukrainian chefs work in this city…
March 15, 2024
Restaurant review: Avocado in Lviv, Ukraine
Lviv is known as the cultural capital of Ukraine, but it is so much more…
February 20, 2024
Useful Phrases In Ukrainian For Tourists - Jet Set Together | 16th Apr 21
[…] Hiking Hoverla, The Tallest Mountain In Ukraine […]
Adrenaline Tour In The Carpathians, Ukraine - Jet Set Together | 19th May 21
[…] to the mountains with many fast rivers); the second day – depends on your choice, you can either hike the tallest mountain in Ukraine – Hoverla, or drive ATVs on the mountain roads, streams, and […]